Does a margarita go with a pizza margherita? Maybe … but that’s not important right now. What’s important right now is that I’m craving pizza, and margherita is one of my favorites. Let’s make one!
Created in the 1880s and patriotically named after Margherita of Savoy, the first Queen of unified Italy, pizza Margherita’s simple ingredients – ripe tomatoes, fresh basil and mozzarella cheese – were chosen to represent the red, green and white colors of the then-new Italian flag. It’s no coincidence that these ingredients, baked on a well-constructed pizza round, also bring together the ultimate in classic Italian flavors.
I love so many of our local pizzerias, but sometimes during a pandemic it’s good to fashion dinner at home. Here’s a simple take on this old classic. The dough is based on a modern baguette technique rather than the classic pizza method, but the fundamentals aren’t much different – the perfect baguette and the perfect pizza dough both rely on utter simplicity, made with good flour, water, yeast and salt and nothing more.
This procedure makes a small batch for a pizza just big enough for two. Or, okay, for one, if you’re really hungry. If you try it, let’s hear how it went!
INGREDIENTS:
(Serves two)
FOR THE PIZZA DOUGH:
6 ounces (180g) white bread flour or all-purpose flour or a combination
1/2 teaspoon (3g) salt
1/2 teaspoon instant dry yeast
4 ounces cool water (room temperature)
FOR THE MARGHERITA TOPPING:
4 to 6 ounces fresh, whole-milk mozzarella
1 or 2 large, fresh tomatoes
2 tablespoons good olive oil
6 to 8 fresh basil leaves
PROCEDURE:
1. Put the flour, the salt and the dry yeast into a bowl and stir in the water, a little at a time, mixing until the resulting dough forms a rough ball. Put it on a lightly floured bread board or counter top and knead it vigorously for 5 minutes or more until it’s smooth. You want this to be a fairly “wet” dough, so if you prefer you can use a mixer, but for a pizza this small it’s easy enough to work by hand.
2. Lightly oil a bowl and put the dough in it to rise. Cover with a dish towel or piece of plastic wrap. Let it rise in a cool place for three hours or so, until it’s a full 2 1/2 times its original size.
3. If you have a pizza stone – and I recommend one for both pizza and bread – put it in your oven on a lower shelf and crank up the heat as high as it will go, 500F or a notch above.. Give it plenty of time, at least a half-hour, to preheat thoroughly. If you don’t have a stone, a pizza pan or cookie sheet is fine. No need to preheat it, but do give the oven a fiery hot head-start.)
4. Form the pizza. Contrary to old-fashioned bread-making advice, do not punch down the risen dough. Simply turn the bowl over and let the dough fall out onto a lightly floured surface. Sprinkle it with a little flour, pick it up, and let it stretch out naturally as you handle it. Drape it over the backs of your hands and gently pull and stretch it into a large circle. Don’t press or handle the dough any more than necessary. It’s not necessary to obsess about this, but the more you can avoid “de-gassing” it, the better bread it will be.
5. Put a sheet of parchment paper on a bread board or pizza peel if you have one. Gently place the pizza round on the paper, nudging it into a rough circle. Geometrical perfection is not important, and don’t worry about crimping up the edges. Remember, the less handling, the better.
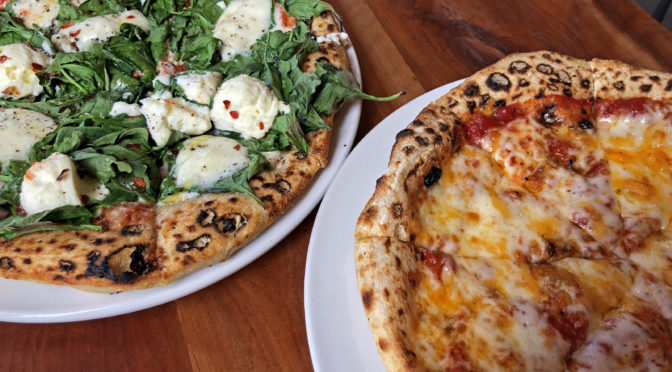
5. Put on your toppings. Slice the mozzarella into rounds and put them down first, then slices of tomato, and drizzle on a little olive oil. Don’t overload this delicate pizza with toppings. (If you want to keep it really simple, just make a cheese pizza like the one pictured at the right at the top of this page: Smear on good tomato sauce, and not too much. Top with shredded mozzarella, and proceed.)
6. Slide the parchment paper with the pizza on it onto the hot stone right in the oven if you’re using one; or slide it onto the pizza pan or cookie sheet and put it in the oven. If you’re using the stone, slip the paper out from underneath after two or three minutes so the bread rests directly on the hot stone. Check after a couple of minutes and turn the pie if it seems to be browning faster on one side than the other. Bake until the edges are puffy and dark golden-brown – timing will vary depending on oven temperature, edge thickness and toppings, but at this high heat it shouldn’t need more than 6 to 8 minutes. Carefully remove it from the oven, garnish with the basil leaves, and serve while it’s sizzling.